Whenever I see the word conflict when using Git, it feels very intimidating and scary.
Something most developers hate to see and try to avoid like the plague is merge conflicts. However, trying to avoid merge conflicts on GitHub is not a way to solve the problem. Taking your time to understand why the merge conflict happened and how to resolve it is a much better solution, similar to the approach of Bridging the Gap: From Python to Scala with Quantexa, which emphasizes understanding challenges in technology transitions.
My intention for this article is to help clarify the process of resolving a merge conflict and why they occur in the first place.
Hopefully, by the end of this article, you’ll be able to understand the concept of resolving merge conflicts and feel more at ease when dealing with them.
Resolving a Merge Conflict: How did we get here?
A merge conflict happens when Git is unable to automatically resolve differences in code. This can be between two commits or branches. The reason for this is that there are conflicting changes to the same line of code or document. So Git gets confused and does not know which version you might want to keep or discard. In this case, there is a need for human intervention.
A classic scenario of this will be when Developer A makes changes to a file named ‘custom.js’ and when it is time to push the changes to the develop branch, it turns out Developer B made similar changes to the same file which has been committed and pushed to GitHub. Now a merge conflict occurs.
You can always start over if you make a Merge Mess.
It’s important to state that the process of resolving a merge conflict can be undone if you make a mistake and want to start over. In this case, you use:
git merge –abort
So you can’t go wrong when merging a conflict with this under your belt. You can always start over from a clean slate.
What does it look like when a merge conflict occurs?
In the previous article, we have walked through how to create a PR. Git detects a merge conflict when a developer wants to raise a PR (Pull Request). This is what it looks like:

After creating a PR, Git will highlight the conflicted areas, and ask which code you wish to keep.
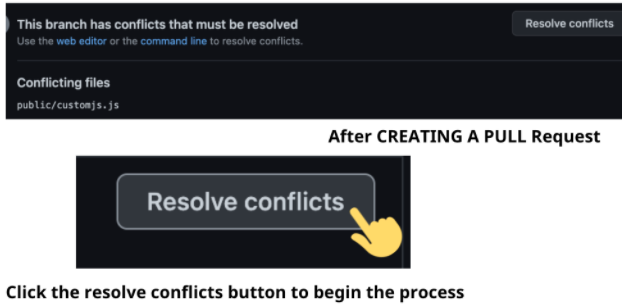
This is not the only way a merge conflict can occur. A second scenario where this can occur is when you merge another branch into your working branch. In this case, we are merging the main branch into our develop branch using git merge main.
If there are conflicting files, it will look like this:

We will look at resolving the conflicts in the two scenarios in the next section.
How to resolve a merge conflict in Git
Scenario 1: On GitHub when raising a PR request
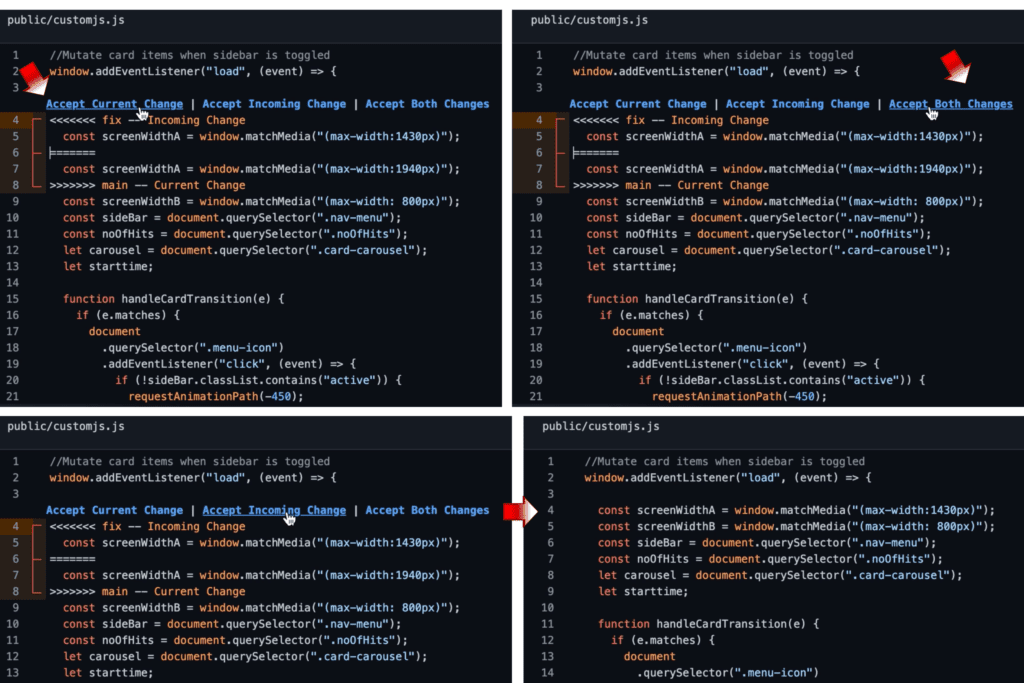
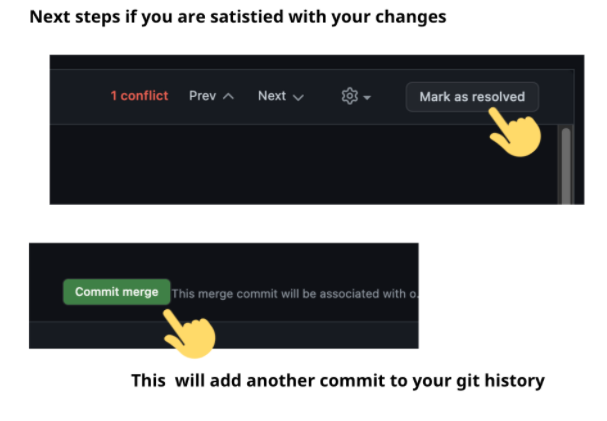
The resolve conflicts button opens up an interactive editor where you can see Incoming Change and Current Change. Git is smart enough to highlight the points of the conflicts we need to resolve using arrowhead symbols.
<<<<<<<<<< <name of branch> — Incoming Change: Represents the changes you made in your branch that you would like to merge in.
>>>>>>>>>> <branch you want to merge into> — Current Change: Has the changes in the current branch you want to merge into.
These two changes are normally separated with `==========`
Accept incoming changes if you would like to keep your changes instead, or current change if you want to discard your changes. There is also a ‘keep both changes’ option if that applies.
NB: It is always good practice to collaborate with another team member if you are unsure what changes should be kept or discarded.
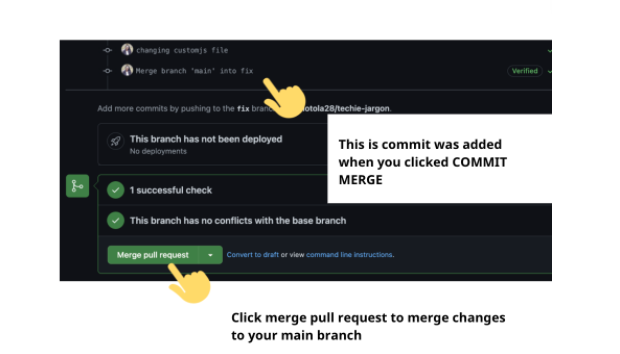
A few things to note here:
Scenario 2: When you merge another branch into your working branch
Navigate to the file where the conflicts are highlighted. You will then notice arrowhead symbols in the conflict areas. This looks a little different from what is expected on GitHub. In your IDE (e.g. VsCode) it comes up like this:
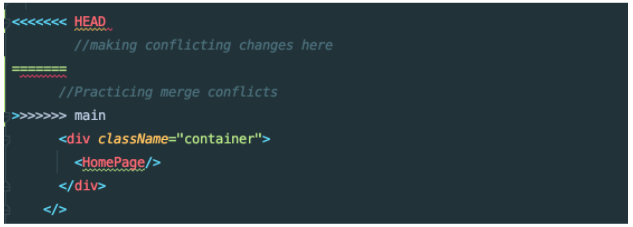
<<<<<<<<< HEAD refers to the changes you have made and would like to merge into another branch. While >>>>>>>>> main are changes that currently exist in the branch you want to merge into.
At this point – to accept changes, delete the arrowheads and leave the code snippets that you want to be the final version. After making those changes in the three steps listed below, you will complete resolving the issue.

And that is it! Hopefully, seeing the word “conflict” doesn’t look so scary anymore. If the article has increased your confidence level with resolving Git Merge Conflicts? Why don’t you share the article and tag us? We like it when you smash your programming goals 🙂
Till next time! In the next article, we will be discussing How to undo a Commit – You really don’t want to miss this one.
Reminders
Useful Links
A merge conflict in Git occurs when two branches have changes in the same part of a file, and Git cannot automatically determine which changes to keep. This situation requires manual intervention to resolve the conflicting changes.
The git merge command combines changes from one branch into another. It integrates the histories of both branches, creating a new commit if necessary. If there are no conflicting changes, Git performs the merge automatically.
To merge two branches in Git:
-
Switch to the target branch:
git checkout main -
Merge the other branch into the current branch:
git merge feature-branch
If there are no conflicts, Git will complete the merge automatically.
To resolve merge conflicts using the command line:
-
Identify conflicted files:
git status -
Open and edit the conflicted files:
Look for conflict markers (<<<<<<<,=======,>>>>>>>) and decide which changes to keep. -
Mark the conflicts as resolved:
git add <file> -
Commit the merge:
git commit -m "Resolved merge conflict"
This process finalizes the merge after resolving conflicts.
To minimize merge conflicts:
-
Pull changes regularly: Keep your branch updated with the main branch.
-
Communicate with your team: Coordinate changes to avoid overlapping work.
-
Use feature branches: Isolate new features or fixes in separate branches.
-
Commit frequently: Break down changes into smaller, manageable commits..
These practices help in reducing the likelihood of merge conflicts.


