

In this article, we will be building a JavaScript Project together!
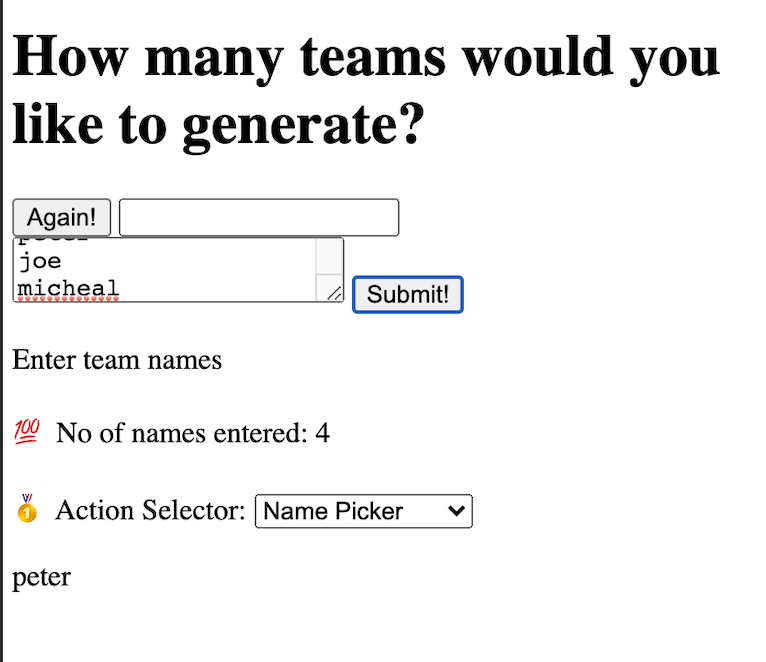
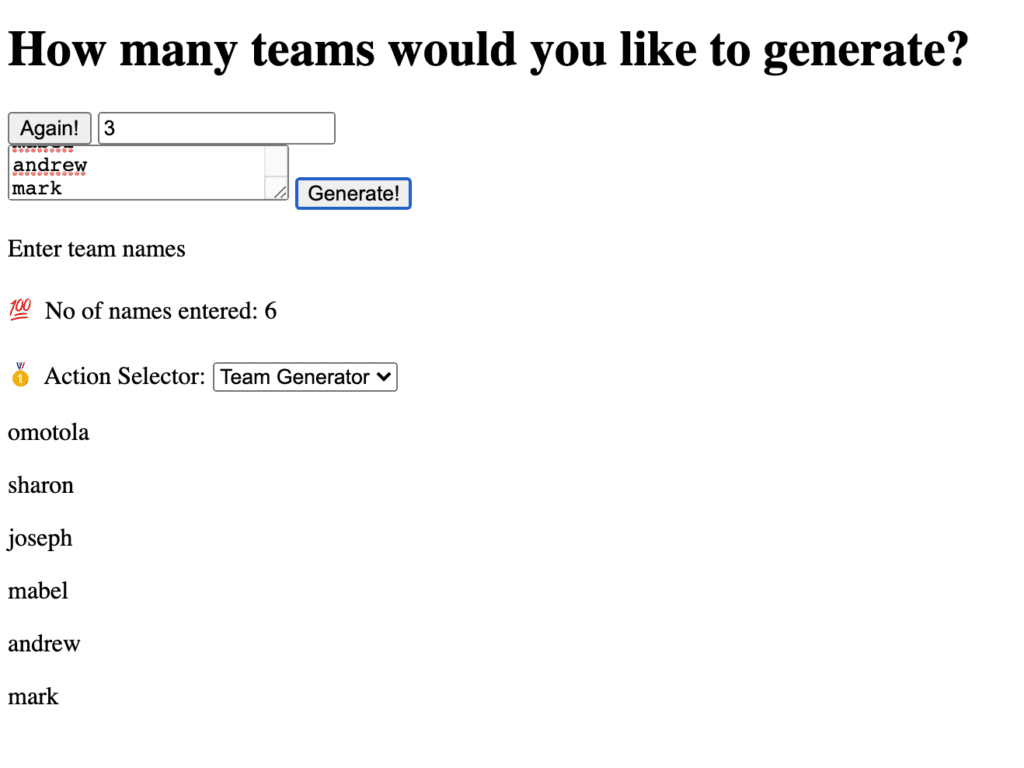
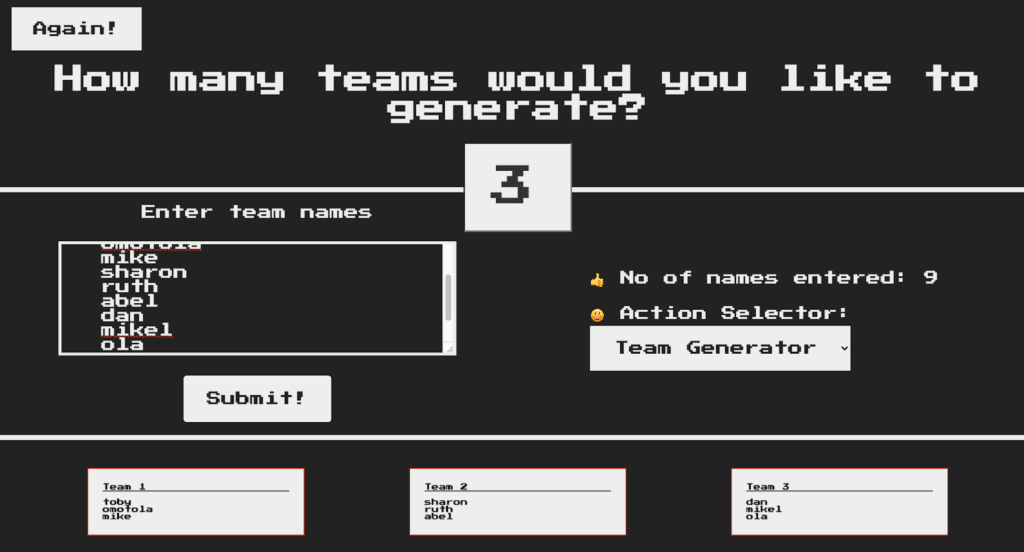
How exciting! 😊. The project is a random team generator. If you are like me, a visual learner, I have attached a screenshot of what we will be building below.
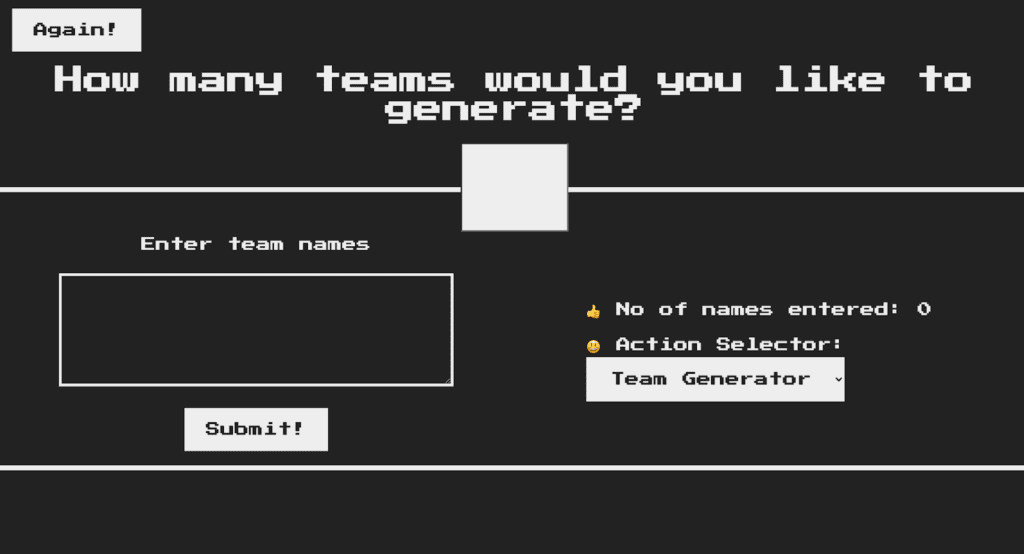
These are the features this project is going to have:
- An input box to accept the number of teams the user would like to generate
- An input box that takes the names of teammates
- A counter that shows how many player names we have entered
- A picker that allows the user to toggle what actions they would like to perform with player names, in this case *’Team Generator’ and *’Random name picker’
- We get a nice display of our equally divided teams.
NB: Feel free to skip sections, not all sections may apply. All code used in this tutorial can be found here
Great let’s get started.
Sections Breakdown
- IDE Setup
- HTML & CSS Crash Course
- DOM & DOM Manipulation
- Building A Team Generation App
a. Mark up
b. Logic
c. Testing
d. Refactoring
e. Styling - It’s Time to Brag!
IDE Setup
The VScode software application is a popular IDE (Integrated Developer Environment) used by most developers, it’s where we write code. If you do not have this installed, I suggest you follow this link to watch how to download it. VScode also allows you to add some useful extensions that will aid your development process.
NB: Note in this tutorial we will be using pure CSS, HTML and JavaScript. No frameworks or Libraries.
Now let’s talk about file structure; because this is not a huge project, all files required for this project are stored in a ‘src’ directory. So first create a project folder called ‘myfirstproject’ followed by another folder called ‘src’. Inside the src folder we can create three files:
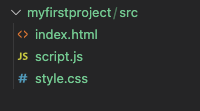
- index.html – This holds the code for how we would like our page to be structured.
- style.css – This holds code for styling our HTML page.
- script.js – This holds code for writing JavaScript to make our webpage more dynamic.
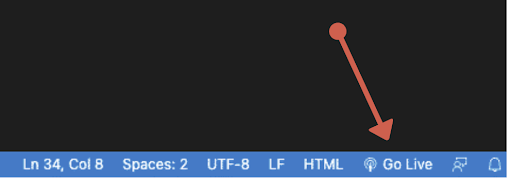
If you successfully installed VScode and the suggested extension LiveServer from the video, you can click on the ‘Go Live’ button in the bottom right corner to activate it. Once you click this button, any changes made to your files will be automatically reflected in the browser. But now nothing shows because we haven’t started writing any code.
HTML & CSS Crash Course
HTML is described as a markup language, meaning it describes the content/layout of a website page. CSS on the other hand is used to style this page to make it more beautiful. If you are a complete beginner to HTML & CSS I suggest you take some time to watch the Crash Course linked to get a broader idea of these two languages.
However, if you just want to dive straight into coding, you just need to understand a few things:
- Html files hold elements which are written with opening <> and closing </> arrow brackets
- These elements have attributes like IDs which should be unique or classes which can be shared with multiple elements. There are other attributes like type, value etc.
- Html pages are normally broken down into head (contains information about the page) and body (contains the page layout/structure, and necessary script files)
- CSS files select HTML element IDs, Class or attributes to apply styles to
- To select
- ID – You use a # [followed by name of id] e.g #my-id
- CLASS – You use. [followed by name of class] e.g.my-class
- ELEMENT – You just write the element name e.g. div
- ID – You use a # [followed by name of id] e.g #my-id
- CLASS – You use. [followed by name of class] e.g.my-class
- ELEMENT – You just write the element name e.g. div
- CSS has several ways of selecting elements, according to its name Cascading Style Sheet the last selector would override a previous selector if the same element is selected. So in CSS specificity of elements you want to style is very important.
DOM & DOM Manipulation
JavaScript is used to manipulate the DOM, however the DOM methods we will be using are not part of the JavaScript language. If you want to have a quick read about the fundamentals of the language, I suggest you read this article.
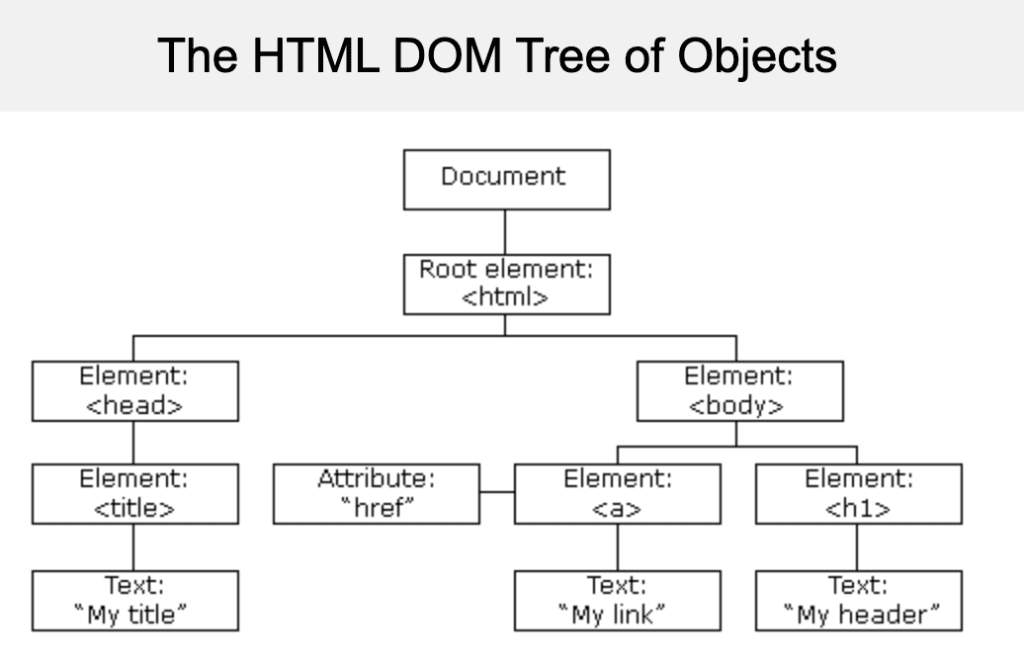
The DOM (Document Object Model) is a structured representation of HTML documents, it allows JavaScript to access HTML elements and CSS styles in order to manipulate them. So we can basically say the DOM is a connection point between our HTML or CSS code and JavaScript.
The Tree structure is generated by the browser on page load. Each element in the tree represents a node in the DOM Tree Structure. We have Parent Elements and Children Elements. At the top of this tree structure is the document node which is known as the entry point into the tree structure. We use this document node to query for other elements in the tree. e.g. document.querySelector(). There are multiple other methods the document object can use to access the nodes in the DOM tree for manipulation. But for this project we will be using mostly the ‘querySelector()’
Building A Team Generation App
Now that you have a slight understanding of how the various parts of our application will come together, let’s proceed to build the application 🎉.
a. Mark Up
Before anything, first we have to write the layout of our one page application using HTML. In the html file we use a couple of elements. I will explain a few core elements and what they are used for.
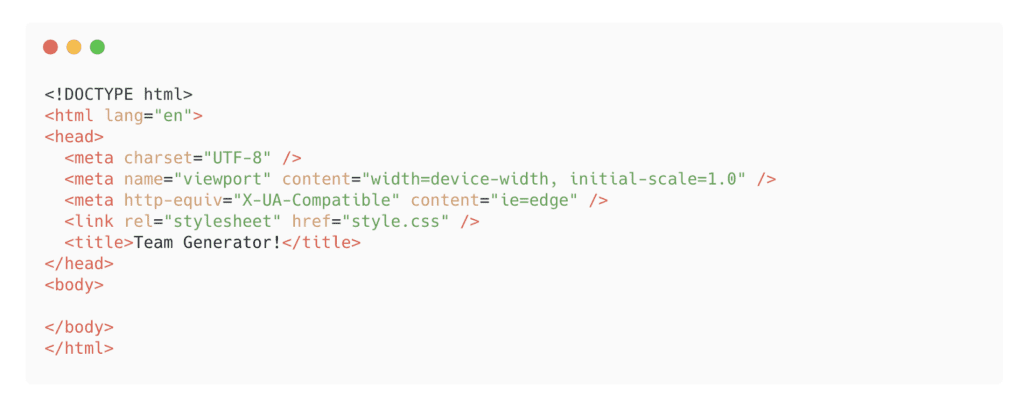
- <!DOCTYPE html> – This declaration explains to the browser what type of document to expect. In this case it’s HTML.
- <html> – This represents the root of an HTML document, it contains all other HTML elements
- <head> – This contains metadata (data about data) and it’s usually placed between the <html> and <body> tag
- <body> – This tag defines the content of the HTML body, it usually contains other elements like header, mains, sections, paragraphs, buttons etc.
<head> Element
Starting with the basic structure, in each element you will notice it has other properties like lang in the html element and charset in the meta element. These are known as attributes. If you are curious about what each attribute in the meta element means, read more about this here.
We can also add links to external resources in our head element, in this case we have linked our custom CSS file. We could also link our script file here, but its best practice to allow the page load before adding our JavaScript file. Furthermore, we would add this at the bottom instead. Finally, all pages should have a title element that names the page, this can be any name of your choosing. Now that we have explained the head element, let’s move onto the body element.
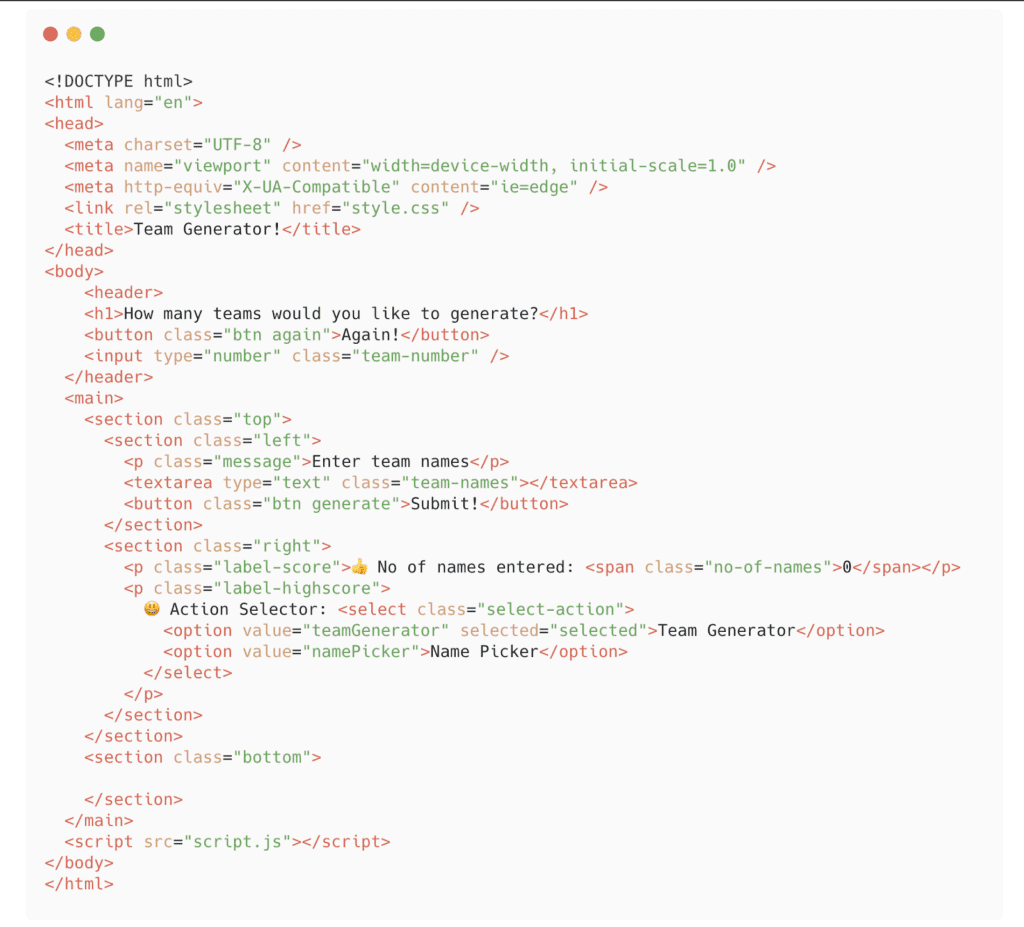
<body> Element
In this section we have used relevant elements to semantically describe the body of our page. That is we have declared a header, and a main section. In our header we have a call to action where users are prompted to enter the number of team players to generate. In the main section we have two more sections which happen to have an element named section. If you notice we have an attribute called class which is used to group elements together for styling. In this section we have sections with class attributes top and bottom, and inside top we have class attributes left and right.
Other attributes to take note of in this section are
- The type attribute which enforces the type of value expected as an input.
- The value attribute which holds the value we would like to pass when an option is selected.
Just before the closing tag we add the script.js file we would be writing all our logic in.
Click the Go live button or refresh your page, and it should be looking like this.
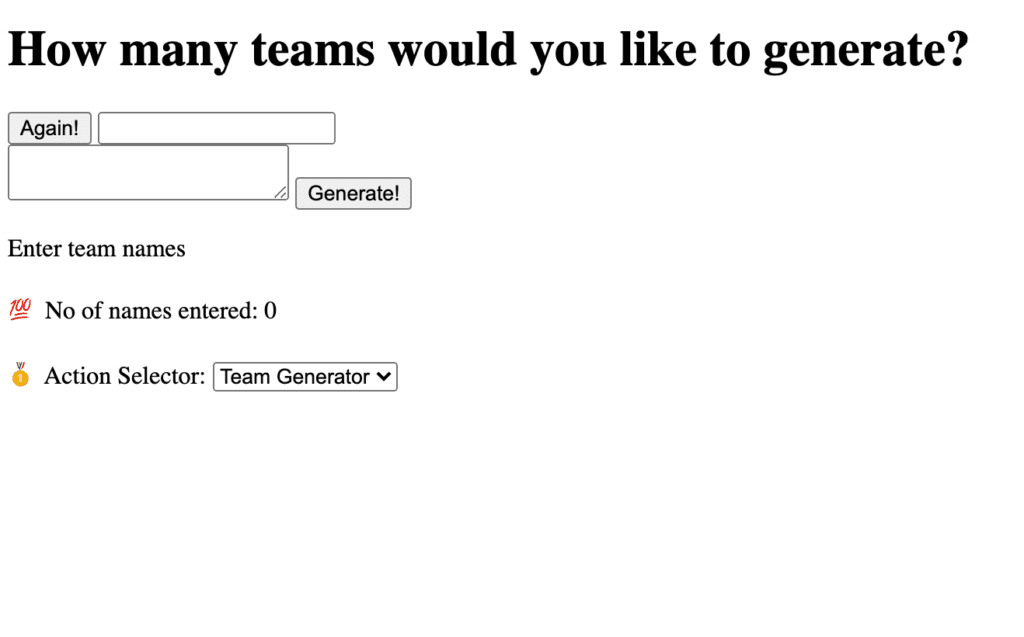
Great! Markup done. Now let’s move to implementing the logic.
b. Logic
I like to implement the logic before applying styles because it just gets it out of the way, allowing me to spend as much or as little time playing with styling. Inside the script file we start the file with this expression ‘use strict’; which indicates that your JavaScript code should be run in strict mode, thereby catching errors like using undeclared variables.
I like to select all the elements I would be manipulating or expecting interactions by a user first. Through the DOM, we can select specific elements. I also declared global variables at the top of the JavaScript file.
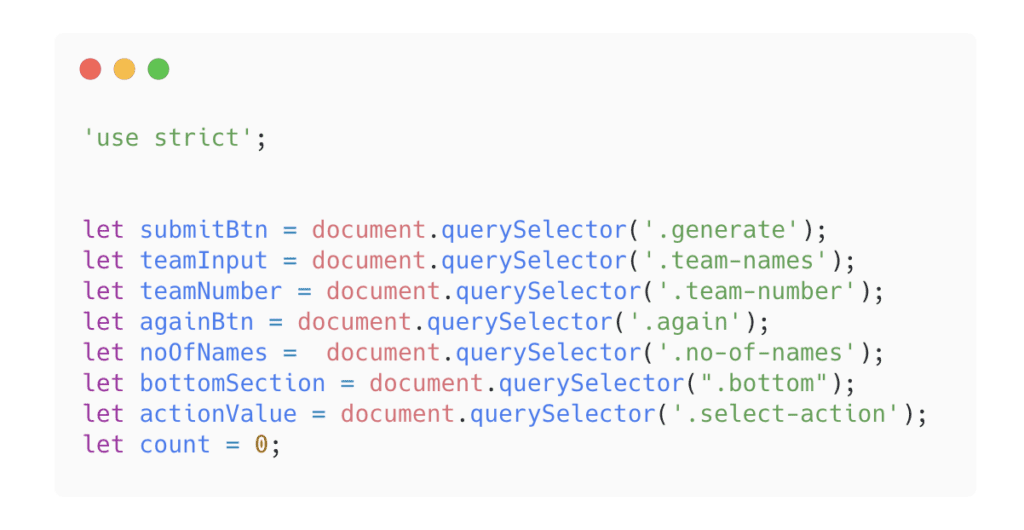 Take some time to notice what values are passed to the querySelector(). If you look at your html file you will notice that this corresponds to class attributes. So the first selector in this case is referring to this element.
We did not use the btn class name because it is shared with other button elements we would like to behave differently when it is clicked. But a shared class attribute name will help with styling
We can add an event listener to input & button elements, so here we would like to handle the event for clicking the buttons submit and again.
Handling Submit Button
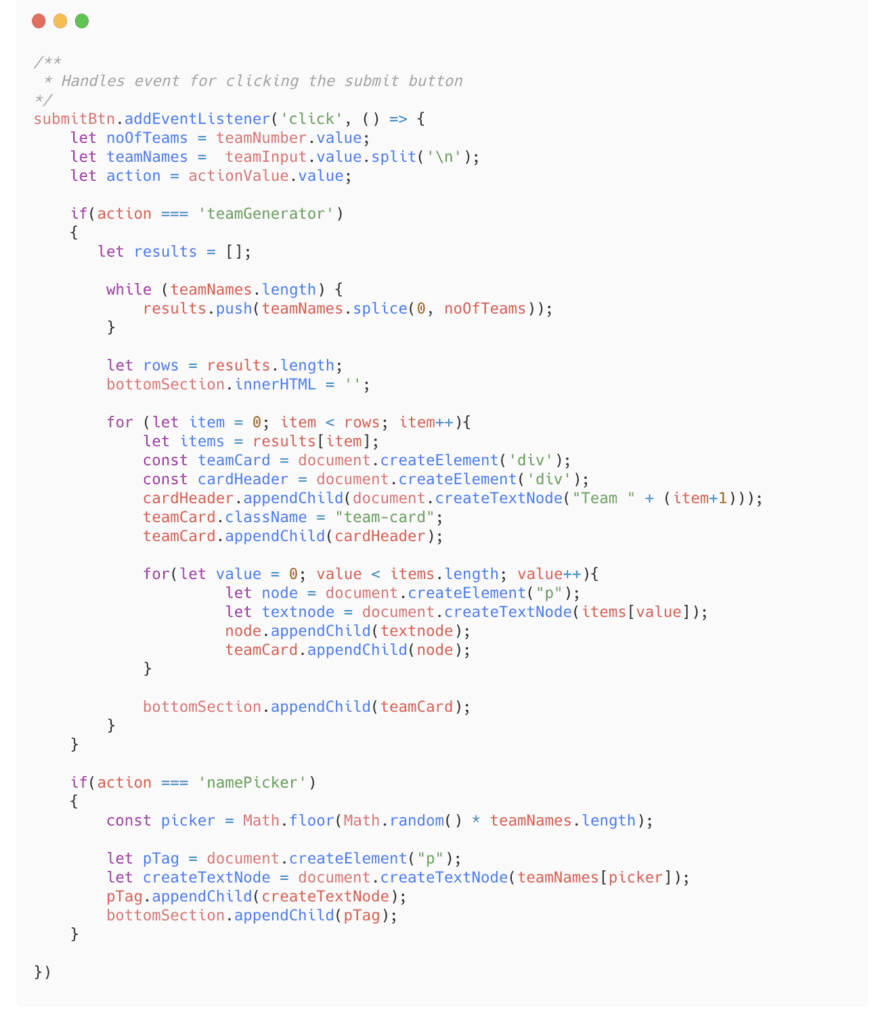
Yes it’s a lot of code but let’s take a look at what this is doing.
- Team Generator Action
- First we take the value from our input field for the number of teams we want to generate.
- Then we take all the values from the textarea box, the split function splits the names into an array of names. How does it separate each name? It does this by looking for the ‘\n’ flag we passed it. So after every new line it pushes the name into an array.
- We also take the value of our selected dropdown menu.
- Then we check if the value from the dropdown menu is ‘teamGenerator’, if it is then we would use the noOfTeams we want to generate to split the array into an equal group of team names.
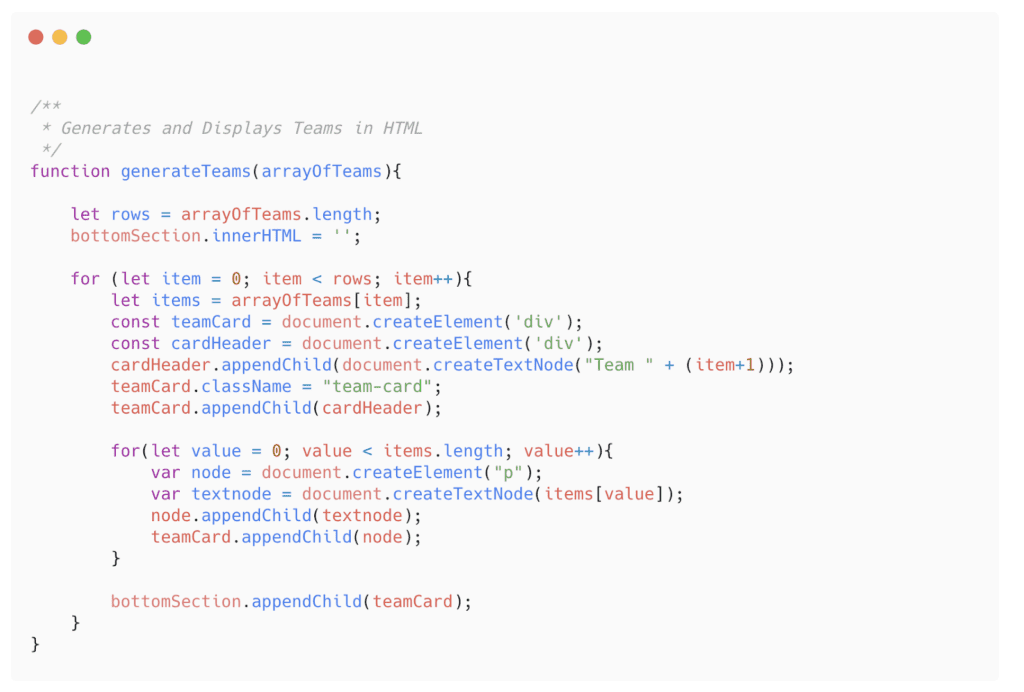
- This array is used to create an HTML element to display each group to the user.
- The outer loop is for the outer array and the inner loop is for the inner array values. The outer loop creates elements that will contain the Team Name and Containers
- The inner loop creates the paragraph element and text node that will be inserted in the paragraph and added to the container
- Finally, this div (another HTML element that serves as container) is inserted in our section with class attribute bottom.
NB: If you would like to look at another way of working through nested arrays check out this demonstration of how to loop a nested array of numbers to multiply them for a result.
If you add all the input values in your markup you should see a generated list of names like this.
- However, if the action is a namePicker, then a second if statement is executed. Using the Math.random function it returns a random index from between 0 and the length of the teamNames array. This index is a number we can use to access values from an array.
- We create HTML elements to display the random named picked and also append this to the bottom section.
Your outcome should be this
Handling Again Button
We just want to reset the input boxes when the again button is clicked, and also remove any displayed HTML manipulation we might have done. So basically resetting the whole page.
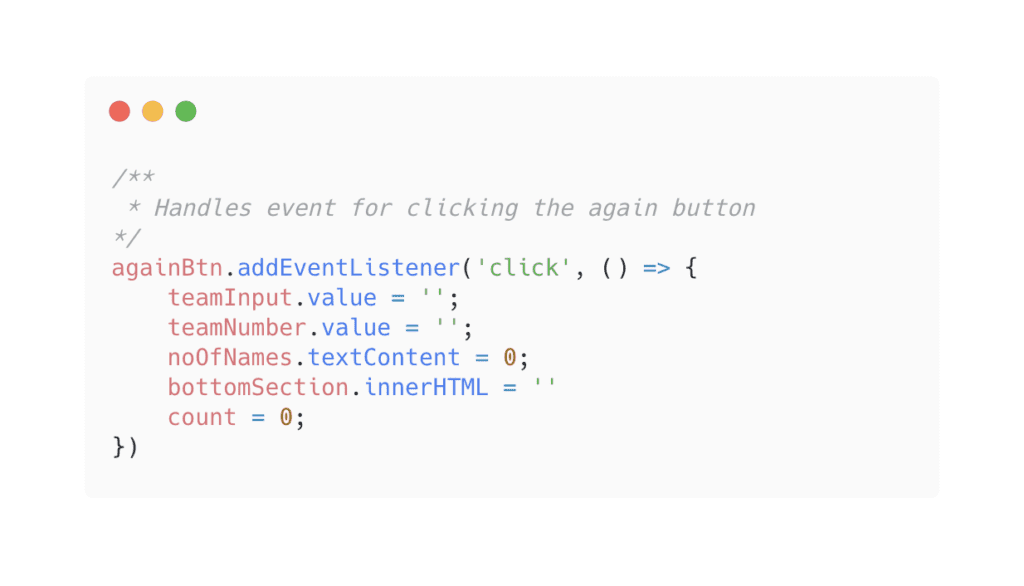
This should reset the page for new inputs.
Handling counting the number of names entered
This feature displays the number of names a user has entered in the textarea box, it’s useful just in case the user loses count.
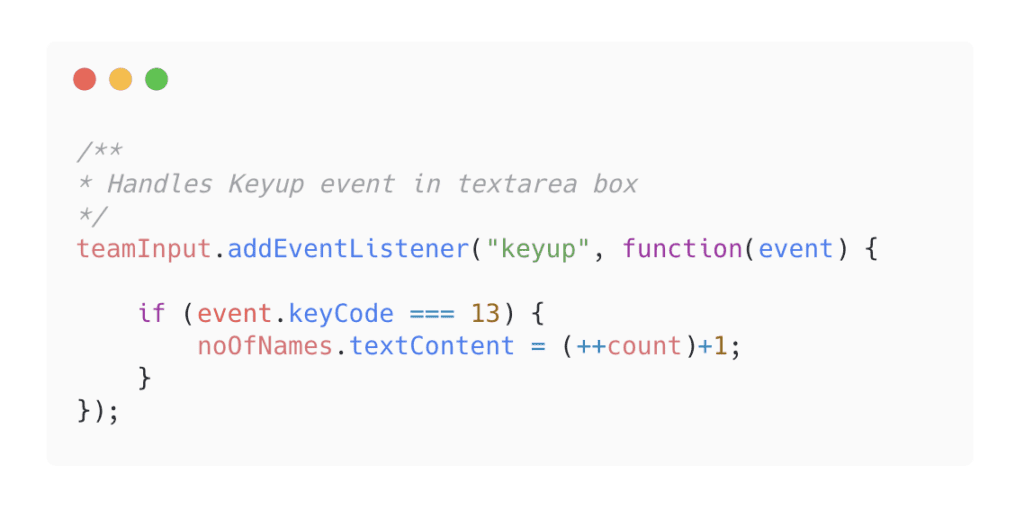
The keyCode 13 stands for Enter on your keyboard, noOfNames has already been selected at the top of the file and textContent is what we would like to change. In this case we have a shorthand for incrementing numbers. We add 1 after incrementing, so it can match up correctly with our keypresses.
Now it’s time to do some testing! 😃
c. Testing
What happens if we do not have some inputs given by a user? For example if you enter names without the number of teams you want to generate?… We go into an infinite loop which crashes the page. Let’s prevent this from happening.
We will create a separate function to handle this check. This function will take noOfTeams and arrayOfTeams as parameters. It will return true if a value is entered in the input box or false if not or if it violates other requirements.
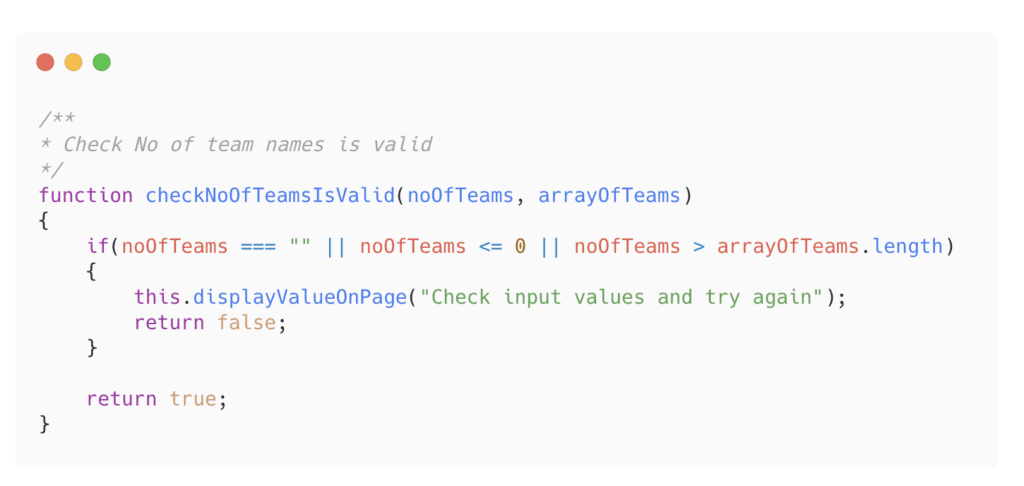
From this function we can say, if the noOfTeams is empty, less than or equal to zero, greater than the number of names inputted, it means it is not valid, therefore return false.
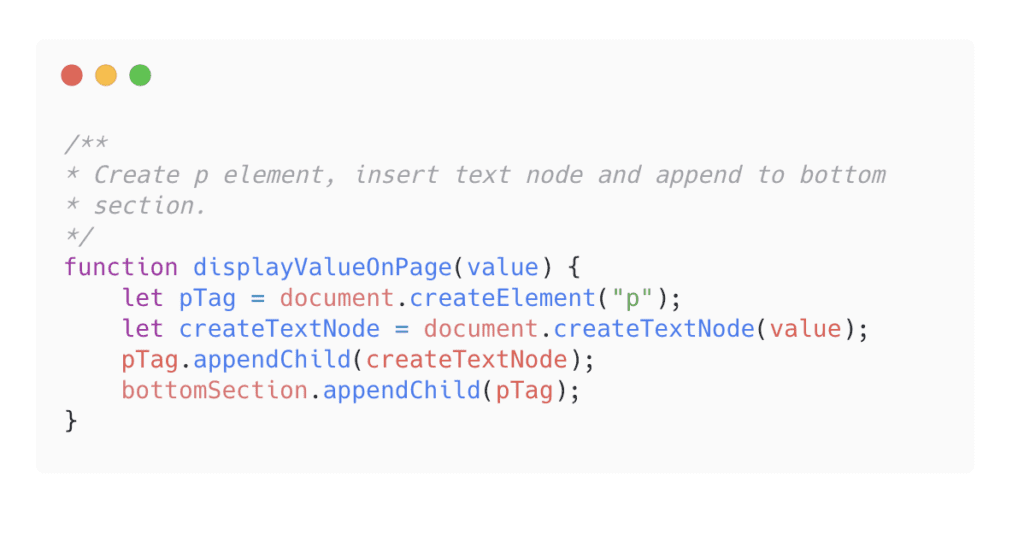
You might notice there is another custom function called displayValueOnPage which takes in the value we would want to display. This is how it is implemented.
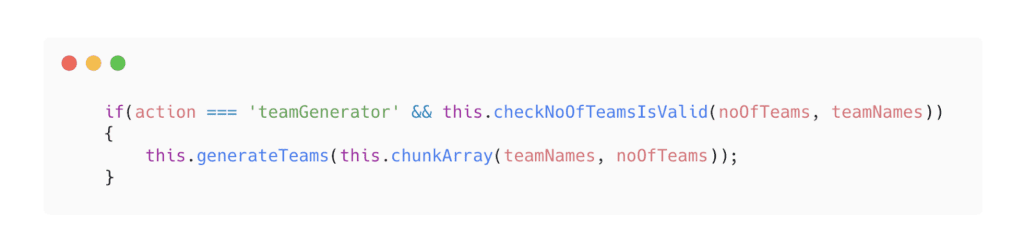
 Lastly, we need to add our check to the submit button click event function. So this changes to:
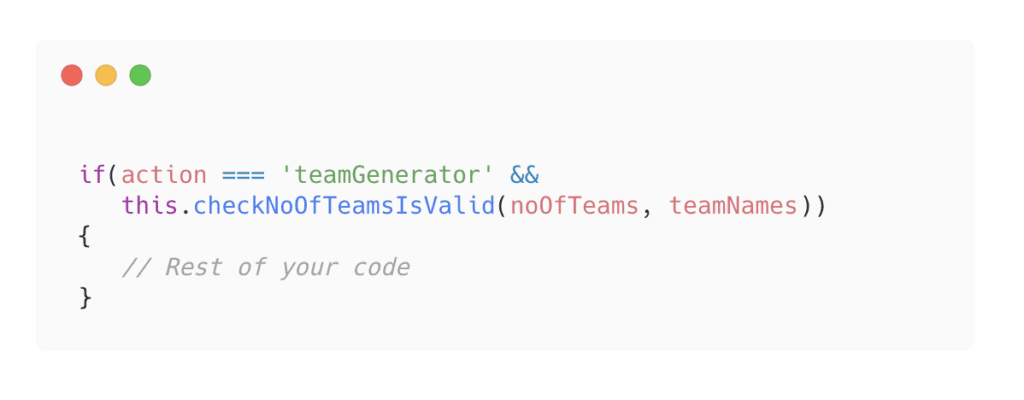
The && symbol ensures that both the right and left sides of the operator are true before the contents of the if statement is executed. Now try it again and instead of a crashed page you get a nice warning text.
d. Refactoring
If you have ever heard of the term before, it is how we try to make our code more maintainable and easier to read. Remember the rule of thumb about just writing as much code as you can, and after it works go back and see what you can do better. That’s exactly what we will be doing here.
If we look back at the code written so far we can make a couple of things better.
- Separate the functionality of grouping the names into arrays and generating the HTML markup for displaying them
-
Do the same thing for the name picker action.
Heard of functional programming? It is the act of breaking chunks of code into functions so they do one thing or serve one purpose. In this case we have three functions to write.
-
Group Teams by Size of Team
The handy function splice allows us to do this seamlessly. This is the same thing as we had before, but we have just made it reusable by passing the relevant parameters.
-
Generate team in Markup
Now the Submit Button click event should look cleaner if we replace the current code we have with this.
Several lines of code have just been replaced with one line of code, tell me you haven’t fallen in love with how your code looks now! I will repeat the same thing for the other half.
-
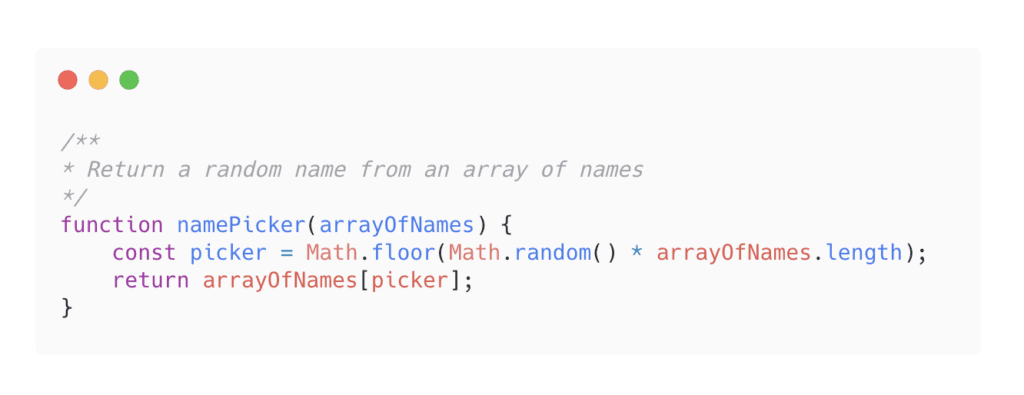
Random name Picker
This takes in an array of names and returns the value of a random name from the array of names.
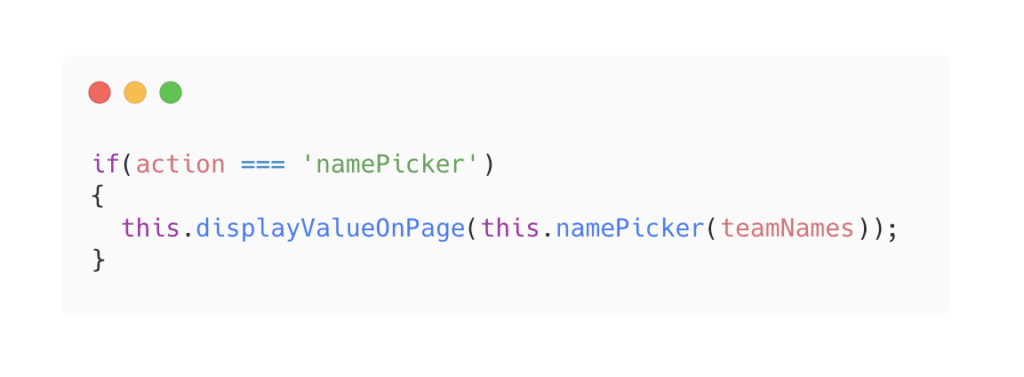
Now we can use this to replace what is in the second half of the handle submit button click function. And using the function (displayValueOnPage) we created earlier, emphasizes the usefulness of creating functions.
Great – and that is all the refactoring we need to do. Now for some colourful FUN!
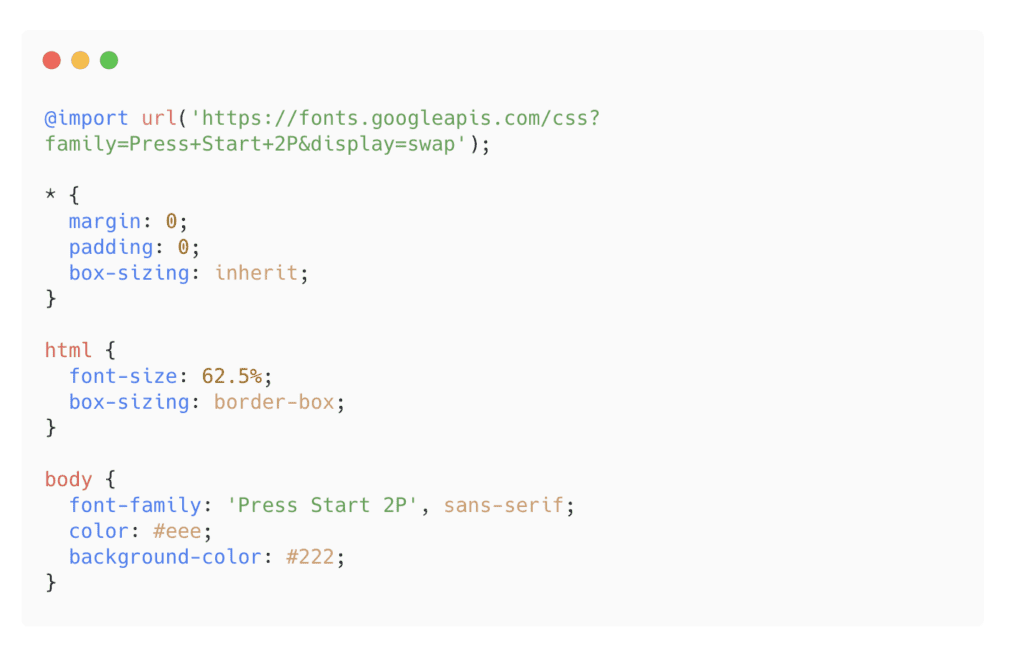
e. Styling
At the top of the CSS file we import a custom font, you can use any you want. I copied this link from the Google Font website. I used this font Press Start 2P.
- Select a font you like
- Click on ‘select this style’ for any style of the font you like
- You should notice an @import radio button, click on that
- Copy the text in between the <style> tag
- Paste it at the top of your CSS file
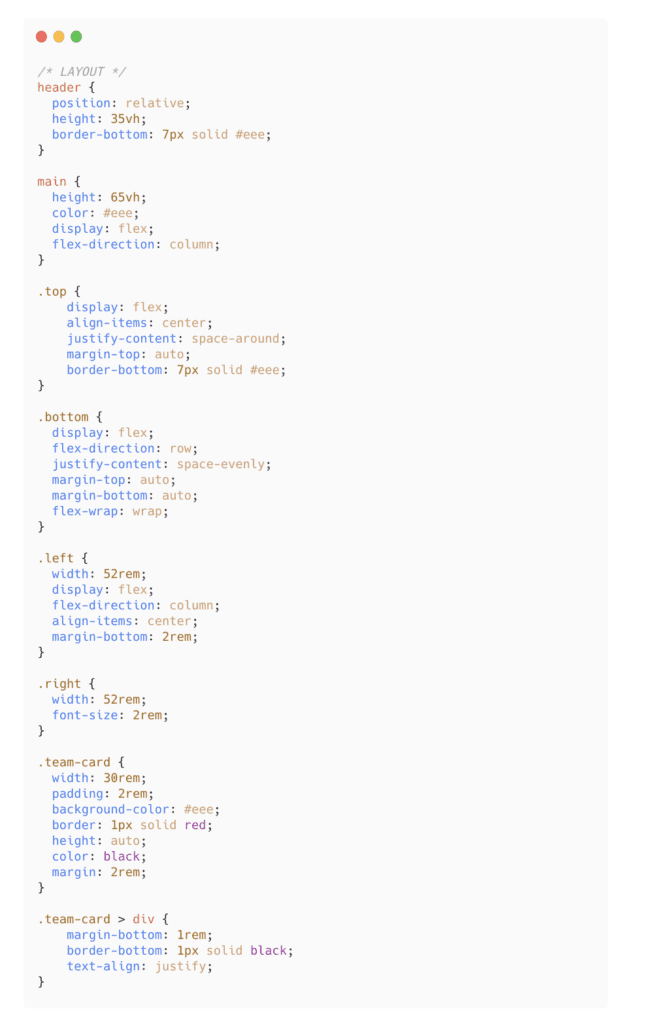
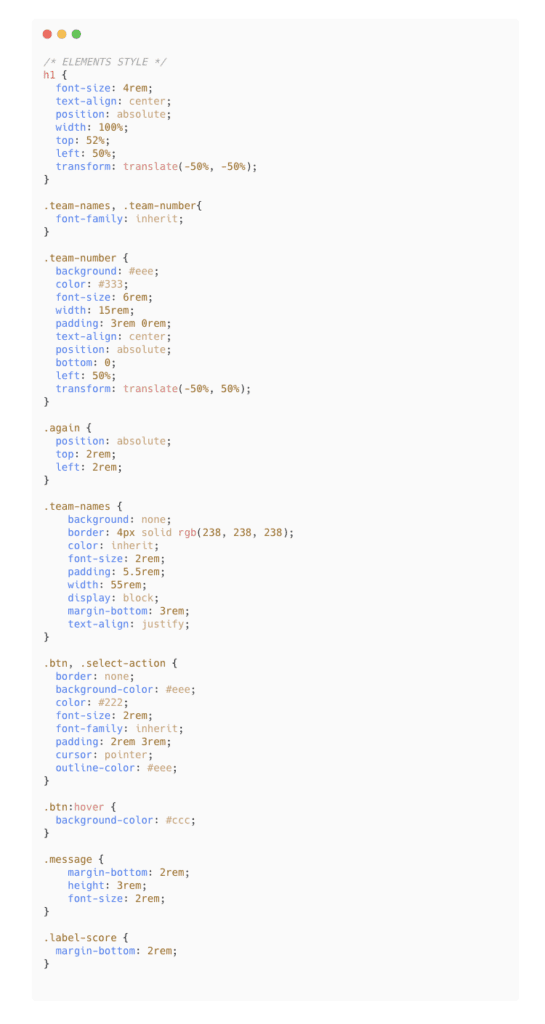
For styling, you can select elements using the elements themselves for example html, body, main etc. Or you can select what to style using classes indicated like this ‘.top’. If you watched the CSS Crash course this should make a lot of sense to you. This is the styling used for the page.
-
For Global Elements
-
For Layout
-
For Specific Element Style
That’s all the styling needed for the page. Your JavaScript application should be looking very similar to the page we started with. Test it out? Does it generate the team names?
It’s Time to Brag!
If you made it this far congratulations 🥳, it would be great to show off your work! Tag me on Twitter or Instagram @mycodinghabits and I will give you a shout for a job well done. If you have any questions, or you are stuck you can email me at: mycodinghabits@gmail.com.
You can also add more functionality to this project. Get really creative with it. For all the code used for this project, you can find it here.

AUTHOR:
Omotola Shogunle – SheCanCode Blog Squad
To send Omotola an email: mycodinghabits@gmail.com